Internet Of Things: Difference between revisions
| Line 222: | Line 222: | ||
Sometimes you need to go to the light in the phone app, click on settings, then block settings and unblock either or both permanent switched on or permanent off. In the settings you can see what timer programs a light is part of | Sometimes you need to go to the light in the phone app, click on settings, then block settings and unblock either or both permanent switched on or permanent off. In the settings you can see what timer programs a light is part of | ||
== Finding specific devices == | |||
In device settings you can search for the actuator / light by typing to the right of the filter button on the bottom left. | |||
You can also select the filter "push identification" by cliking on the filter button which allows you to press the button you are looking for and it will select the device configuration | |||
== Rebooting / resetting specific devices == | == Rebooting / resetting specific devices == | ||
In | In the device configuration select the channel, then the device and then click on the text "maintenance" and the possibility to reboot or reset will appear | ||
== Adding favorites == | == Adding favorites == | ||
Revision as of 07:11, 24 November 2021
Protocols
You would think that this would be straightforward but it isn't. Common protocols are:
- Wifi
- Zigbee - this means your bridge has to speak the Zigbee language (see below) the device has to work with it
-- LightLink (EU)
-- Home Automation (US) Note - these two protocols don't play well with each other. It looks like HA is being phased out in favour of LL.
-- Smart Energy
- Z-Wave
Nowadays we have Z-wave Plus which offers various benefits, so make sure any device you have is Plus.
Home Assistant has the following list of compatible USB controllers and OpenHab has this list of USB bindings. The one they share is the Vision Z-Wave USB Stick Gen5 (around EUR 34,-)
- X-Wave
contoller / Smart Hub
The controller runs the bridge devices that each individual vendor brings with their devices. It's a single central place to run all of the devices from.
The absolute Ferrari on controllers is:
Smartthings hub which supports Wifi, Zigbee, Z-Wave at $99, now owned by Samsung
This is the list of compatible devices
As an alternative you can run open source software, which will run on a raspberry pi with a zigbee usb controller.
Project Things from Mozilla
ppenHAB written in java
Zipato, which comes with a beatiful tile interace thingie
OpenHab a vendor and technology agnostic open source automation software for your home
Snips is an offline AI Raspberry PI DIY voice controller which functions as a private version of Alexa or Google Home
best bet currently
Home Assistant, Open source home automation that puts local control and privacy first. Powered by a worldwide community of tinkerers and DIY enthusiasts. Perfect to run on a Raspberry Pi or a local server. It runs on Hass.io, which turns your Raspberry Pi (or another device) into the ultimate home automation hub powered by Home Assistant. With Hass.io you can focus on integrating your devices and writing automations.
Home Assistant has huge amounts of compatible components
It's championed in the bottom of this thread
Bridges
Bridges are hardware connections.
The HUE bridge has a limit of 50 connections. You can add another bridge to your HUE app, but you will have to switch bridges within the app, which is annoying. You also can't backup your setup.
The Dresden Elektronik Raspbee Premium (SD card image [1]) doesn't have the 50 device limitation and has a backup function. It can be used through the HUE app itself. It also uses deConz software to detect devices. These also support Xiaomi devices.
The Dresden Elektronik Conbee is a usb zigbee stick for windows machines
The husbzb-1 Z-Wave / Zigbee USB device. From [2]
I have husbzb-1. I went out of my way to find out more about this device. I contacted both Nortek and SiliconLabs for help, which is not that helpful.

It turned out that husbzb-1 is mostly a z-wave device. The zigbee is just something the OEM threw in as “added value” and the OEM themselves doesn’t know much about it.

As result, you can expect this thing work well with z-wave.

Zigbee, on the other hand, is a bit tricky.

Much of the tricky part is due to zigbee standard itself. Unlike z-wave, which is practically all-in-one, so as long as there is the word “z-wave”, it should work with each other within a country/region.

Zigbee, on the other hand, by itself doesn’t mean anything from an user’s perspective, because much of compatibility rely on zigbee PLUS some libraries built into the device.

if you have a zigbee device (e.g. light bulb, sensors, etc), you kind of need to know which library that device uses, and you need to make sure your zigbee dongle (husbzb-1) has that built-in as well. These library, though mostly software, can not be added or delete once the device is out of factory.

For our purposes, home automation, there are THREE libraries that may be relevant:

    home automation
    light link
    smart energy

The worse part is that zigbee allow vendor to create their own proprietary library, renders device from that company incompatible with anything else on the market.
The best example of such is Xiaomi. Xiaomi devices are zigbee devices, but they uses proprietary library thus none of xiaomi devices will work with anything else from other companies out of box. Security companies such as ADT probably also uses proprietary zigbee devices so you won’t able to connect your husbzb-1 to their devices directly.

As result, when you buy a zigbee compatible light bulb, for example, you need to know if that bulb uses “light link” profile or “home automation” profile. and you need to compare with that with the dongle(husbzb-1) you have.

And here is the frustration part, being an owner of husbzb-1: the OEM nor Siliconlabs (the maker of zigbee chips inside husbzb-1 dongle) knows for sure what zigbee library does husbzb-1 contains.

The closest answer I have gotten is from Siliconlabs, after I told them which chip and what software stack does this dongle contains (in case you are curious: chip used is Silicon Labs EM3581, and software stack is EmberZNet Pro Release 5.4), the tech support says that it MOST LIKELY include

Home Automation version 1.2

What does it mean?

It means that it is UNLIKELY that zigbee light bulb which uses light link profile would work with husbzb-1 out of box.

And here is where this community comes in: if someone got a light bulb uses standard zigbee light link profile (ikea tradfri… kudos to ikea for using standard profile) and managed to get it to work without ikea hub, then, it means husbzb-1 has light link built in.

if someone got a zigbee smart energy monitor device (many utility company in USA is selling such device at heavy discount to promote energy saving) and managed to get it to work with husbzb-1 out of box, then, it means husbzb-1 also contains “smart energy” profile.

but it means someone has to be willing to take the chance and buy the product and see it connect to husbzb-1 or not.
ABB free@home
ABB Home and Building Automation FAQ News
You can access a product assistant in the app by clicking on the hamburger (more menu) and then going to the help center
Prerequisites for using the free@home local API
Scenes vs Light Groups
Groups come in two types:
- switchable light group
- dimmable light group
Scenes also:
- automatic scene
- custom scene
Dimmable groups can collectively be set to the same specific dimming level (eg 70%) when turned on, even if there are lights which only switch on and off in the group. This is in contrast to a custom scene, where you can choose the dim level per light in it.
When adding a light group all the lights in the house are automatically added to it and you have to remove them.
When adding a scene you have to choose which lights are added one by one.
Scenes can be given different icons, whereas there is no real way to tell the difference between a light group (sometimes seen as an actuator) and a lamp.
Setting dimmer brightnesses
By clicking on the blue icon you can set more or less brightness by clicking on the + and - signs. This will increment up 1%. By holding the click, you can increment 10%. By clicking on the bulb itself you can turn it on and off.
Timers
Dimmable lighting timers
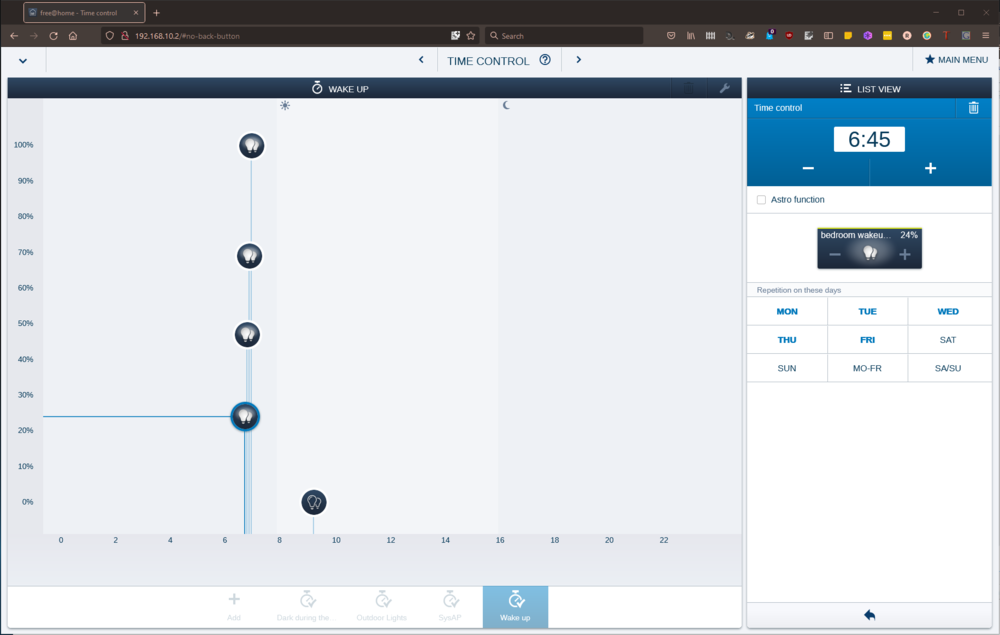
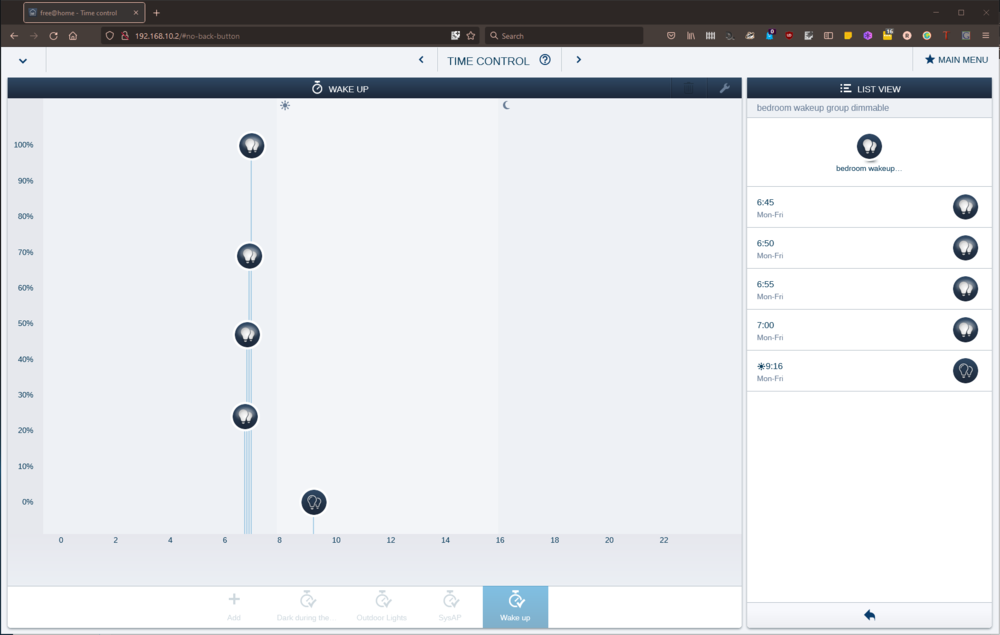
When you create a lighting group make sure it's a dimmable group and add the lights. You can click on the stories of the house to select graphically. Make sure you only have lights with dimmers (you can tell because they have a % brightness on the blue icon). In the time control you have to add on states for each dimmer, eg 06:45 = 30%, 06:50 = 50% etc). You can set the dim level by clicking on the + and - signs on the blue icon Put all your non-dimmable lights in another timer.
Schedules
wakeup dimmable
wakeup
  on 0700 no astro mo-fri
  off astro +1:00 earliest 0830 latest 2359 mo - fri
Dark during the day
  on 7:46 astro offset -0:30 at the earliest 7:00 latest 23:59 mon - sun
  NOTE: If you leave this in here the lights will turn off even if it's dark outside due to cloud - this will interfere with the brightness lights on action, which even at 0 switching time is too slow to turn the lights on fast enough. So GET RID OF THIS!off: 8:46 astro offset 0:30 earliest 0:00 latest 23:59 mon - sun
  on astro 15:23 offset -0:30 earliest 0:00 latest 23:59 mon - sun
  off 23:30 mon - sun
light brightness actions
ABB-Free@home manual page Examples of possible actions
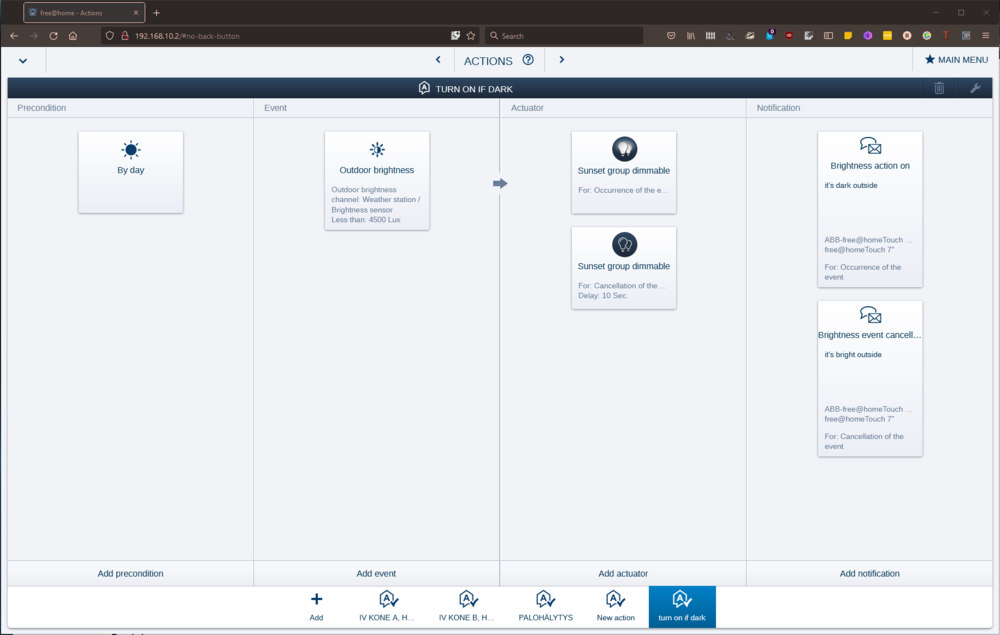
It seems that 5000 lux is enough to not need the lights on by day. If you have a weather station, set the following two actions:
Action 1: Turn on if dark
Precondition: by day
Event: Outdoor brightness Less than 5000 (you can empty the more than field)
Actuator: can be a light or a group. The first time you set the actuator it creates a for: occurence of the event action. You can then add the same actuator again and it will create a for: cancellation of the event action.
- If it's a single light, keep it on standard operation and set the brightness / dim level on the icon (high or off [by clicking on the light bulb itself] for occurence
- If it's a group, you can't set the operation status. You have to click on the icon to set the status. So make sure it's on and set the dim level (by clicking on the plus on the icon many times) for occurence
NOTE if you set it to Forced operation mode, you lock the channel and lose the possibility to use this light or group using the app or other timers / events. It will only be controlled by the action that forces the operation mode.
You can add a notification without email or push message by clicking on Display device and selecting the display panels if you have them
Action 2: Turn off if bright
Precondition: by day
Event: Outdoor brightness more than 6500 Lux; Delay: 120 sec; Switch off delay: 120 sec
NOTE We set the delays and the difference in Lux levels so that the lights don't keep switching on and off in 'edge' cases, where eg clouds are going in front of the sun.
Actuator: light group set to off
You can add a notification without email or push message by clicking on Display device and selecting the display panels if you have them
depreciated
This system caused conflicts with the cancellation turning off lights which then weren't being turned on again because of 2 reasons
The timer setting the lights on is set to start just before sunset (using the astro function) which means:
- If for some reason brightness goes up between the period of the timer going on and sunset, the action cancels and turns off the lights, which won't go on again (because the timer only switches them on once at the astro time) and
- The day action cancels anyway at sunset (because it's set to by day) so turns off the lights, which won't go on again (because the timer only switches them on once at the astro time)
Took some figuring out that this was causing conflicts.
Icon meanings / blocked lights
If the icon has a triangle with a ! under the light and then a lock symbol in front, this means that the device channel has been locked. The app will have an i overlay saying this device is disabled and if you press it, will tell you: "This element is deactivated because the channel is currently in locked mode". To solve this check actions for the device and see if there is an icon with a lock overlay. This means it is in forced operation mode, which locks the channel.
If a light in a light group is locked in this way, the icon will appear over the light group too.
Sometimes you need to go to the light in the phone app, click on settings, then block settings and unblock either or both permanent switched on or permanent off. In the settings you can see what timer programs a light is part of
Finding specific devices
In device settings you can search for the actuator / light by typing to the right of the filter button on the bottom left.
You can also select the filter "push identification" by cliking on the filter button which allows you to press the button you are looking for and it will select the device configuration
Rebooting / resetting specific devices
In the device configuration select the channel, then the device and then click on the text "maintenance" and the possibility to reboot or reset will appear
Adding favorites
In the blue screen after logging on (the control mode), click and hold / longpress the light / scene / group you want to add as a favorite and a popup will appear allowing you to add it as a favorite.
I haven't figured out how to add weather station information as a favorite.
Smart Lighting
Transforming dumb switches
Busch Jaeger
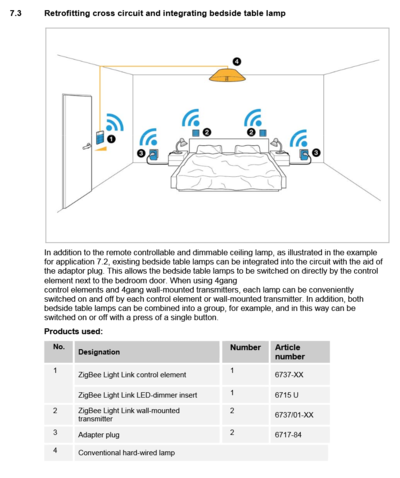
Busch Jaeger has three Remote control zigbee light link / radio control dimmer switches (rocker, LED dimmer) which will integrate with the HUE bridge. Once you put in a wall insert, you can put different controllers on top of it (one, two or four lane) to control the dumb light. You can then add extra remote control light switches in other location to control the same lights.
So you need:
  the insert (6715 U for 4 switches, 6711 for 2 switches)
  A front panel switch
  A panel for around the switch (Future design)
[Other options such as multimedia, checking if doors and windows are open]
File:busch-jaeger-zigbee-light-link.pdf Read the systems manual here
Idealo has the best prices for the dimmers I have found so far. Around EUR 80
Elelabs Zigbee Shield is another raspberry pi addon which works with OpenHab
Robbshop
ROBB Smarrt HUE compatible rotary dimmer Zigbee SKU: ROB_200-014-0 Philips HUE compatible rotary dimmer with Zigbee. Max. 300Watt for LED and 600Watt for traditional lights. Use a dimmer bypass when connecting it 2-wire. Zigbee version which can be connected to a Hue bridge, Z1 or Z1S or Homey, but he is also in one Z-wave version. Around EUR 80,-
Pairing
In the front to the right of the dimmer wheel attachment is the reset button hole. Press five times rapidly and the lamp itself will start blinking rapidly and the red status light on the wall insert (above the reset button) will also start blinking rapidly. Start the search in the Hue bridge and it will find it as a normal lamp.
LED Dimmer
230V Controller Treiber Dimmer Dimmaktor ZIGBEE, kompatibel mit Philips HUE®, Osram Lightify® und IKEA TRÅDFRI® [Energieklasse A++] around EUR 60,-
Philips HUE
It's worth getting a Philips Hue starter Pack with the 2.0 bridge to start you off. NB Philips Hue Lux (only white dimmers) controllers can't control LED lamps with colours, but the full HUE kit can control the white LUX lamps
identifying connected items
To identify lights, click on their name in light setup and they will flash.
To idenfity sensors, click on their name in accessory setup and the LED will flash.
To identify dimmer switches, go to accessory setup and press a button. The last button pressed will be shown under the name of the accessory. I haven't found a way to get the LED to flash yet.
compatible devices
iconnect hue supported devices list
Integrating dumb lights in my smart home
Busch Jaeger will integrate with the HUE bridge (note: max 100W)
Robb has a Hue insert dimmer that works with LED up to 200W and conventional light up to 400W. It requires a blue wire
The Robb knob smartdimmer comes with a knob and insert and works for up to 300W for LED. You can install a dimmer bypass with it if you need to connect it with 2 wires instead of 3 (with blue).
Robb also has LED drivers for with Hue.
To control 1-10V LED lighting you need a LED Dimmer controller. The order is: Light switch -> 1 - 10V LED driver -> Zigbee LED Dimmer Controller -> LED light/lightstrip
Applamp has the GLEDOPTO GL-C-009 ZigBee LED Dimmer Controller (ZLL) / Artikelnummer: AL-CO-ZLL-DIM-GLC009 for EUR 30,-
Robbshop has the LEDstrip driver Zigbee 12-36V which should also be a dimmer controller despite the name for EUR 40,-
Lightanshade has the Modular Hue dim circuit module 150-300W 0/1-10V Reference 131901 for EUR 75,-. Modular lighting is an official friend of Hue.
I found ZigBee 0-10V Smart Wireless LED Dimmer Fernbedienung schalter für Hue Echo Plus for EUR 30,- and ordered it but it never arrived. The manual can be found 122551 MINI ZLL Interface but Matcall doesn't sell this thing.
Apparently Friends of Hue will launch a large range of dumb light switches but probably only for Hue bulbs Hue Home Lighting. The partners will be Busch-Jaeger, Feller, Illumra, Niko and Vimar.
Hue also has a motion sensor to trigger the lights. No good for outdoor use. It's very easy to set up but only compatible with Hue lights and won't work with homekit stuff. They are also temperature sensors which you can see in smarthings.
Tips and tricks
When you add lights to a scene, delete the alarm which contains the scene and set it up again. Otherwise not all the lights will always turn on when the alarm goes off.
Use the HUE 1 app for most things, but use the HUE 2 app for the light switches / dimmers. It has more options
The HUE 1 app has support for the Random setting in the alarnms, allowing lights to turn on / off +- up to 30 minutes from the set time. For some reason, Hue2 doesn't have this
Hue restore lets you backup your lights
Hue dimmer
To identify, go to settings, accessory setup in the Hue app. Press a button on the dimmer and in the app you can see which dimmer switch was pressed.
If you can't connect after a power failure / reboot, press all four buttons at once until the green / red light flashes. Resetting the switches by holding down all four buttons until the green light flashed got connectivity back. (Resetting the hub itself didn't do the trick)
This requires a CR2450 battery. Battery levels can be checked in the settings -> accessory setup
Computer control
You can run the official Hue apps on the PC Android Emulator Bluestacks
Hue Dynamic works on Android, IOS, Windows 10 and Xbox One
Huetro for Hue (Windows store) works on Windows 10
Screenbloom syncs Hue lights to your screen (PC and Mac) - Open Source
Routines and Labs settings
Morning
Wake up downstairs (lights on in the morning - routines replaces personal wakeup from labs)
07:00, M/T/W/T/F, Fade in 20 minutes, master bedroom and bedroom serra

Wake up upstairs (lights on in the morning - routines replaces personal wakeup from labs)
07:00, M/T/W/T/F, Fade in 10 minutes, living room, dining room, hall upstairs

Sunrise turn off upstairs (other routines)
Every day, Fade: 30 minutes
Rooms off: hall upstairs, living room, dining room

Sunrise turn off (other routines)
Every day, Fade: 30 minutes
Rooms off: master bedroom, bedroom serra
Evening
Hue labs: sunset to sunrise (turn lights on at night - labs because of offset possibility)
offset 45 minutes
living room, scene relax
dining room, scene evening
study, scene relax
hall upstairs, scene bright
fade in at sunset 5 minutes
turn off at a fixed time: 00:00
fade out time 5 minutes
Hue labs: sunset to sunrise (turn lights on at night - labs because of offset possibility)
offset 45 minutes
kitchen outdoor, scene bright
fade in at sunset 5 minutes
Turn off at sunrise
fade in at sunrise 30 minutes
disabled
Morning
Personal wake up (lights on in the morning - labs)
Relax wake up
Brightness is 70%
Fade in time is 15 minutes
Max brightness at 0700
Days: M/T/W/T/F
Light selection: Living room, master bedroom, bedroom serra, dining room, hall upstairs
Evening
light schedules with randomness (off, for holidays - labs)
Home except kastenkamer, hall beneden, garage, gastenkamer, trappengat
Select time: 20:00
Days: M - S
Turn lights back off at 23:00, add 30 minutes randomness

outdoor living scene: disabled
Forumla scheduler: disabled - sets a formula (eg outdoor living scene) on a timer
Innr
These lights don't allow you to change the default on behaviour to last setting in the Hue app, but are a lot cheaper and look good.
They also have a large selection of products advertised to connect with the Osram or Hue brigdes (including a GU10 for EUR 20) shop here
The e14 candle lights are a bit shorter than the Hue candles. A two pack costs around EUR 37 Amazon.de and work well.
Their smart plug works just as well as the Osram one, but is smaller and less obtrusive (it's all white and has no grey bit). They are around EUR 30 Amazon.de
The ambience type e27 (white range) looks good and costs EUR 22 Amazon DE.
A double pack of e27 coloured costs EUR 55, also good value Amazon DE
Connection with Hue
In order to connect these lights / accessories to the Hue bridge, you have to have them on, start the search in Hue, turn the power off and then on and the app will find them.
If the smart plug becomes unresponsive:
- delete the plug from the Hue app
- press the button for min 5 seconds and the light will flash blue and then go out.
- Unplug the smart plug
- start the search for new lights in the Hue app
- then put it back in.
It may take a while. When the light goes red it should be connected properly.
Osram
Osram Lightify lights should work very well with the Hue system, as they are both Zigbee. However, both Philips as Osram are being a bit silly in their implementation of the Zigbee protocol, which leads to some strange workarounds.
Smart Plug
These work very well.
connecting
- start searching for lights in Hue app
- plug in the smart plug
- It turns up as an on/off plug in Hue
If it isn't found, plug it in closer to the Hue Bridge or a Hue light
resetting
Hold the on/off button until you hear a click and the light goes off quickly
If this doesn't work, you can try the 5x5 reset: plug it in for 5 seconds, remove it for 5 seconds, repeat 5 times.
Otherwise remove the light from the bridge.
GU10 lights
Don't use these things, they don't work well with Hue
Currently the GU10 lights are unstable due to Philips Hue updates, which means that all my connected lights won't turn off fully using the Hue controller, after I added 1 new GU10 light.
The plugs work well too, but it could be that they need resetting or touchlink connections before they work. They didn't need an update from the lightify gateway for me. Detect them as a light with the switch set to on (light is green) and they will turn up as an on/off switch.
resetting
turn the light or plug off for 3 seconds, turn it on for 3 seconds, repeat 5 times. Leave on and wait (10s). If the light blinks, it has worked, if not, repeat.
connecting to Hue
- First you need to upgrade the firmware. If you don't do this, the lights will not go all the way off. This can only be done through the Osram Lightify Gateway (see below).
- After the update, unplug the Osram Lightify Gateway entirely, otherwise it will pick up the lights after the reset
- reset the light (see above)
- turn light OFF
- start up Hue app
- start searching for lights in Hue app
- turn light ON
Note: if the light is already on, the Hue app won't find the light for some reason
- profit
Using touchlink
- Download the lamp finder jar or File:LampFinder.jar
- Plug the lamp / plug close to the Hue bridge (< 30cm away)
- start the jar
- press the button on the Hue bridge to connect
- search for the lamp.
Alternatively
You can do light stealing from the Hue local API. In a web browser go to

http://x.x.x.x/debug/clip.html

where x.x.x.x is your IP address of the hub. This should bring up a web page. Put the light you want to steal within 30cm’s of the hub

You need to URL and/or message body

Register a user
URL: /api
Message Body: {“devicetype”: “HueLights#API”}
Press the Post Button

This will give you a long user name in the response box

URL: /api/YOUR_USERNAME/config
example: /api/7773d8bf606360d23d968ff165e77293/config
Message Body: {"touchlink":true}
Press the Put button

URL: /api/YOUR_USERNAME/lights
Clear the Message Body
Press the Post Button

On my setup this caused the living colours light to flash, I then immediately ran the Connect New lights in the Hue App. Sure enough the Bloom light showed up in the app.

Hope that helps someone else in the future
From here
upgrading Osram Firmware
- reset the light
- plug in the Lightify gateway
- start up the Lightify app
- plug in light at as close a distance as possible to the gateway
- detect the light using the app (you may have to restart the app, as it doesn't always show that it's detected the light properly)
- use the app to update the lights -> you will have to press update a few times before it goes. Once it does go it can take a LONG time. Just wait for the blue line.
troubles with upgrading
The remaining issues I found out to be defective bulbs where they were not updating to the latest Lightify firmware(They are stuck on v1.03.07 and should be on v1.04.12)
My lights are stuck on firmware 1.03.07 according to the Hue app, but the lightify app (connected to a Lightify Gateway) says they are updated to 1.04.12 and can't be updated
Sent back to customer service and replaced.
Bulb types
E27 = screw bulb
GU10 = the little spots with 2 plugs
E27
For lighting you can use many things but the cheapest are:
Philips hue white / amazon GBP 14,99
Philips hue white / BOL EUR 19,95 + EUR 1.99 verzending = EUR 21.95
Lampenonline hue lux white e27 EUR 17.96 + EUR 5.95 postage = EUR 23.91
GU10
The Philips one is ridiculously expensive.
Innr / EUR 20 don't know if it works
Osram Lightify GU10 / Conrad EUR 29.99 + EUR 4.95 postage = EUR 34.94 Very iffy support with Hue (I currently can't turn them off)
or
8x GU10 to E27 converter plugs for $7.29
Raspbee
at the bottom is a very very good post on how to work this
Casambi
Timers
To create a timer, you first set up the scene containing the lights you want in the timer (and with the settings eg colour and brightness). You can then create the timer by clicking on the ... and then timers and selecting the timing and then the scene.
Time based scenes A time-based scene can be used to achieve a different dimmed level of a scene or activate different lighting scenarios depending on when the time based scene is activated. A time based scene has the added advantage over a Timer in that it can be triggered at random times, therefore only activating scenes when needed. Time based scenes are primarily designed to be used in conjunction with presence sensors.
Scenes + timers
Scene: kitchen
Timers:
Evening
Lights kitchen@100%
on all days 43 minutes before sunset
off all days 23:33
fade time: 08:01
Morning
Lights kitchen@100%
on workdays 06:46
off all days 1hr 08 after sunrise
fade time: 11:10
Display
Smart Heating
Wiser is a more up to date alternative to Evohome, but only for TRVs
Motion detection
Outdoor the best way seems to be to connect a Fibaro Relay to a standard "dumb" outdoor motion detector
Controlling Lights with Fibaro Relays
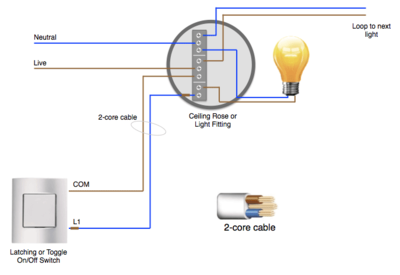
The way Alwas in this post did
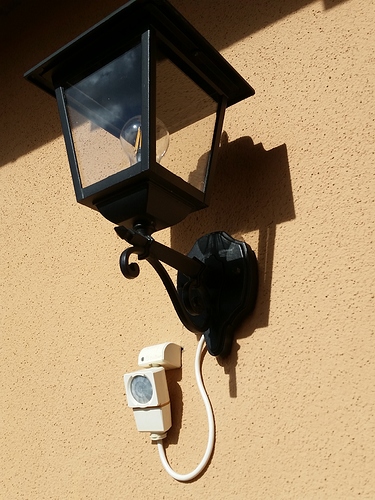
Power Plugs
Philips used to make a Living Whites powerplug which was dimmable with Hue, but it seems to be discontinued.
Wemo has a smart plug (but Wifi, not Zigbee)
Osram has a lightify plug but it only supports on and off. EUR 25,- at Azerty
Innr has smart plug no idea if it supports dimming. EUR 35,-
other devices
Smart Home DB a database with loads of devices linked to reviews and howtos
fakeTV - programmable but not zigbee
TV Simulators tend to have a few options: an mp3 player, a timer, an automatic mode where they turn on when it gets dark and then goes for a few hours (typically 4 or 8 hours) before turning off. You can't get them on Zigbee, so I guess you have to get a zigbee enabled power plug.
fake Dog
Fibaro 4 in one motion sensor GBP 45,61
Wulian for curtain controllers, door locks, luxaflex, sensors, light bulbs, doorbells CHINA
Monitoring
Domoticz is a system to monitor and configure lights, switches and temp / rain / uv/ electra / gas / water sensors.
connectcomfort and cacti guide for honeywell
evohome / connectcomfort cacti graph templates
Gardening
Lawncare
Rachio smart sprinkler controller
Rainmachine smart sprinkler controller
Farming
Farm.bot Drag and Drop Farming: Graphically design your farm by dragging and dropping plants into the map. The game-like interface is learned in just a few minutes so you’ll have the whole growing season planned in no time. EUR 1270,-
How it works
[http://www.makeuseof.com/tag/control-philips-hue-lights-arduino-and-motion-sensor/ an explanation of Philips, how to control them using an Arduino and what Zigbee is (basically a mesh)
