Ubiquiti: Difference between revisions
| Line 73: | Line 73: | ||
grep username messages | grep username messages | ||
you will find the IP address assigned to the username | you will find the IP address assigned to the username | ||
You can also find the device in Client devices and select VPN | |||
= Unifi UAP = | = Unifi UAP = | ||
Revision as of 11:05, 19 December 2023
Ubiquiti Unifi is scalable and has a linux controller software, meaning you only need to buy APs and a PC with linux on it (ubuntu recommended) to run the network.
UDM Pro / Ubiquiti Dream Machine Pro
Old vs New UI
First remember that there are 2 UI's. The old one has some functionalities that are simply not available in the new UI, especially when it comes to the Insights page! The new UI has nicer statistics and graphics and a much better topology page
Switch to the old UI from the New by going to the gears icon / settings -> System -> New user interface -> deactivate
Switch to the new UI from the old by going to gears icon / settings -> User interface -> New user interface -> apply
Finding the ports used
Old interface: click the light bulb / insights -> click top right above the table and select Switch stats in the drop down
New interface: click the AP icon / devices -> click the switch -> click on settings in the slide in details on the right
VLAN profile problems
From vlans not communicating, can't ping gateway
Change the profile on switch port 2 to VLAN that you want the PC to be in. DHCP should be working so remove the static IP address on the PC.
Once you've changed the switch port profile you will need to tell Windows to grab a new IP address. You can do that by doing 'ipconfig /renew' in a command prompt or by removing and then reconnecting the network cable.
The firewall rule you added to allow inter-VLAN routing isn't needed. By default UniFi has open access between VLANs so you'd only need to add firewall rules if you wanted to restrict that traffic.

The 'All' switchport profile is the reason it's not working. Ports with that profile will have VLAN 1 as their native VLAN and the other VLANs will be tagged.
In your case you want the new VLAN to be the native (or untagged) VLAN.
ALSO record the switchport settings, as these were deleted by an update at some point
Getting Sonos to work across VLANs
create a new network with vlan eg Smarthome / IOT
create a new wifi network eg Smarthome Wifi and connect it to the Smarthome network
In the new UI enable mDNS
advanced features -> advanced gateway settings -> multicast DNS -> enable (enables mDNS reflector service)
In the old UI
  settings -> site -> auto optimise network
  wireless networks -> edit each wifi network -> advanced -> Enable multicast enhancement (IGMPv3)
You should now be able to control the Sonos machines from across different networks
This is useful if you have a smarthome controller on a different subnet from your wifi / wired network and it needs the Sonos devices on the same subnet to control them (eg ABB-free@home needs this)
try: UDM UDMP IoT VLAN Speaker Group fix with mDNS and Google Nest Speakers/Chromecasts and A tip for Sonos and Unifi UDM-Pro users
SSH access
You do this in the main login of the UDMP, not in the Networking side. Go to console settings, allow SSH and enter a password. Login as root. See the bottom of [1]
VPN
How to setup UniFi VPN on UDM Pro
However, swanctl is now no longer supported so you can't really log stuff.
To kick a user off the VPN you have to use the classic interface. click insights, then from the top left drop down select vpn users, mouse over the connection and a button "terminate" appears. You can also change their password in the VPN settings.
You can ssh in and find stuff in
/var/log/messages
/var/log/daemon.log
/var/log/kern.log
/var/log/auth.log
by tailing and grepping l2tp or the username
If you
grep username messages
you will find the IP address assigned to the username
You can also find the device in Client devices and select VPN
Unifi UAP
The UAP-Pro can handle 200 concurrent clients and the UAP-LR / LR / UAP-Outdoor can handle 100 simultaneous clients.
The UAP's are very cheap.
There are still some problems apparently though.
Installing the controller on Debian
This needs to run under a desktop environment, so make sure you have one.
echo 'deb http://www.ubnt.com/downloads/unifi/debian stable ubiquiti' | /etc/apt/sources.list.d/100-ubnt-unifi.list
wget -O /etc/apt/trusted.gpg.d/unifi-repo.gpg https://dl.ubnt.com/unifi/unifi-repo.gpg
apt update
sudo apt install unifi
Then
systemctl enable unifi
systemctl start unifi
visit the controller software at http://localhost:8080
You may need to change the ports
Migrating from another controller on another PC
If you are not changing hostname / IP
- Make sure both controllers are the same version (ie update them both)
- if necessary upgrade the firmware on the controllers
- make a backup to an .unf file of the old controller
- Visit the new controller (using the applet or the website) and restore from a previous backup
If you ARE changing hostname / IP
- Make sure both controllers are the same version (ie update them both)
- if necessary upgrade the firmware on the controllers
- make a backup to an .unf file of the old controller
- Visit the new controller (using the applet or the website) and restore from a previous backup
- On the old controller
When I move the controller, I just go into the GUI on existing controller, under SETTINGS, CONTROLLER, and change the Controller Hostname / IP to the NEW IP ADDRESS, (removing unifi.yourdomain.com) and then check the box "Override inform host with controller hostname/IP"

Since I have the migrated controller up and running already on the NEW IP ADDRESS, after I shut down the OLD CONTROLER, the new one immediately starts provisioning the WAPS.
Press apply changes on the bottom. You should see the new controller status of the APs changing to connected.
An alternative method is to SSH to each AP and use set-inform to point them to the new controller
set-inform http://IP.ADDR.OF.Controller:8080/inform

set-inform, adopt, set-inform a second time.

If you forget the syntax, 'help' will help
files
/var/lib/unifi/data/system.properties
if this doesn't exist
java -jar /usr/lib/unifi/lib/ace.jar discover
/usr/lib/unifi/logs/server.log
/usr/lib/unifi/logs/mongod.log
migrating controller from one machine to another
EdgeMAX EdgeRouter
The UI is slightly confusing as there are buttons on the top, bottom, middle and at the bottom. Also, logging only starts once you log in, so the dashboard and traffic analysis only start once you are logged on.
You can find the full manual here. It's pretty huge.
Basic system configuration
After running the wizard, basic system configuration can be done by clicking the System button on bottom left. This is where you can backup and reboot but also add extra DNS servers to the system.
Config Tree
The config tree allows you to click on the triangles to expand AND view what is in the config (meaning you have to double click on the triangle quite a bit), hover over the name of the config for some more information and the + or - to install or uninstall a service. If you are going to uninstall a service it will show in red.
CLI configuration
When you enter the cli you can run some commands but not change setups. In order to change stuff you need to first enter configuration mode, change your settings, then commit and save
  configure
  set ...
  commit
  save
DHCP
EdgeRouter - DHCP Server Using Dnsmasq
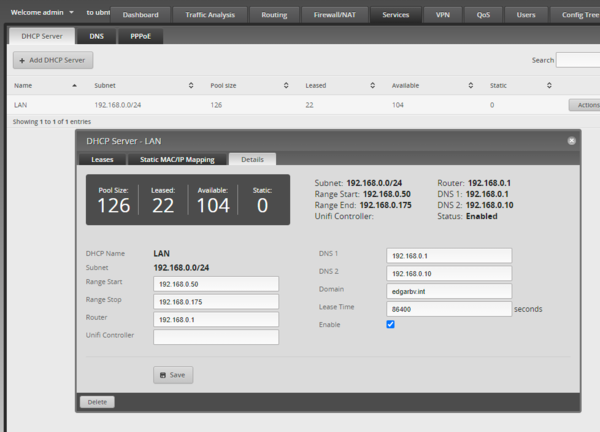
Services (top) -> DHCP Server
Once you have added a DHCP server you can configure it by clicking on Actions on the right of the screen and then View Details.
There are also options under Service -> dhcp-server in the config tree
Adding a third DNS server to DHCP can also be done by cli Edgemax 3 DNS Entries for DHCP Server
ubnt@ubnt:~$ configure
ubnt@ubnt# show service dhcp-server shared-network-name LAN1 subnet 192.168.40.0/24 dns-server
 dns-server 192.168.40.1
ubnt@ubnt# set service dhcp-server shared-network-name LAN1 subnet 192.168.40.0/24 dns-server 8.8.8.8
ubnt@ubnt# set service dhcp-server shared-network-name LAN1 subnet 192.168.40.0/24 dns-server 8.8.4.4
ubnt@ubnt# set service dhcp-server shared-network-name LAN1 subnet 192.168.40.0/24 dns-server 208.67.220.220
ubnt@ubnt# commit
[ service dhcp-server ]
Stopping DHCP server daemon...
Starting DHCP server daemon...

[edit]
ubnt@ubnt# show service dhcp-server shared-network-name LAN1 subnet 192.168.40.0/24 dns-server
 dns-server 192.168.40.1
 dns-server 8.8.8.8
 dns-server 8.8.4.4
 dns-server 208.67.220.220
[edit]

ubnt@ubnt# save
One of the problems you will run into is that even if you set multiple DNS servers, Windows will only read the first one unless it is actually down (see also What is the default behavior of a Windows 7 or Windows 8 DNS client when two DNS servers are configured on the NIC and Best practices for DNS client settings in Windows 2000 Server and in Windows Server 2003. So if you want to resolve internal domain names you will need to work on DNS forwarding.
DNS
System DNS Setting
Beware the System Name Server Setting
The way to minimize the number of local DNS lookups that get forwarded is to specify 127.0.0.1 as the system nameserver, so they go through DNSmasq and are routed and cached the same as DNS requests from clients. To configure the upstream forwarders there are two options:
   Specify addition nameservers for this option. The local system will always attempt resolution starting with the first entry in /etc/resolv.conf, while DNSmasq will ignore 127.0.0.1 and use the additional entries as forwarders.
   Explicitly configure DNSmasq forwarders using set service dns forwarding options server=DNS_Server_IP
I use the second method as it keeps the DNS forwarding options in one section of the config file instead of two.
Resolving
To see what nameservers are being used to resolve
cat /etc/resolv.conf
if you don't want that, use
set interfaces ethernet eth0 dhcp-options name-server no-update
Forwarding
EdgeRouter - DNS Forwarding Setup and Options man page
If you set your DHCP server to put the IP of the EdgeMAX router into the DNS servers section, it uses DNS forwarding using dnsmasq
show dns forwarding
This example shows the DNS servers assigned to the router via DHCP first and the one configured in the basic system configuration (bottom of the UI screen) after that
The DNS resolution of this system is that the system chooses the fastest server and sticks to that.
So in order to put the inputted one on top you need to re-order the system Change WAN DNS Server
  configure
  set service dns forwarding system
  commit
  save
and then
  configure
  set service dns forwarding dhcp eth0
  commit
  save
One of the options to NOT enable is strict-order DNS Forwarding / Name servers / Dnsmasq-discuss DNS search Order
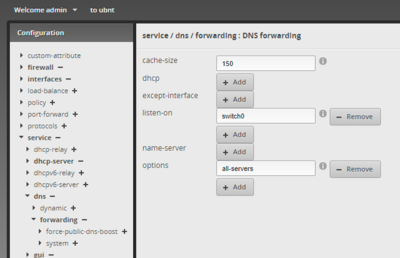
Using the all-servers option sends the request in parallel to every server and it picks the result that comes first. This can be done via the cli
  configure
  set service dns forwarding options all-servers
  commit
  save
Or using the Config Tree
You can see how many queries each has using
show dns forwarding statistics
To clear the cache use
clear dns forwarding cache
To clear the cache and the counters use
clear dns forwarding all


