Synology: Difference between revisions
No edit summary |
|||
| Line 116: | Line 116: | ||
=To find the NAS on linux with netbios= | =To find the NAS on linux with netbios= | ||
You have to enable the bonjour service on the NAS | You have to enable the bonjour service on the NAS | ||
Control Panel -> File services -> Enable AFP service, then in Advanced tab -> also enable | |||
The linux machine needs avahi running. Check using | The linux machine needs avahi running. Check using | ||
Revision as of 14:04, 18 October 2019
Change IP
Control panel -> (connectivity) Network -> tab network interface -> select LAN and click Edit.
Enable SSH
Control panel -> (System) Terminal & SNMP enable SSH
Control panel -> (connectivity) Security -> Firewall tab -> create a rule for SSH (encrypted terminal services), enable and save
for root login as admin and then sudo sh
(you can then log in to the machine using user root and the default admin password)
to enable your users to access the terminal vi /etc/passwd and change /sbin/nologin to /bin/ash
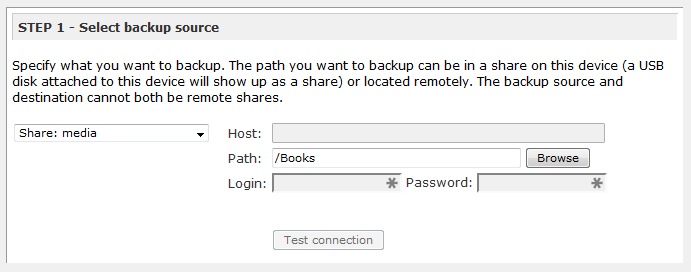
Prepare for rsync
NB the synology can only push rsync files, it can not be set up to pull files from a remote rsync server.
Control panel -> (file sharing) Shared Folder -> create folder to back up to. Give the user you want to rsync to Read/Write access
Start (top left) -> Backup & replication -> backup services -> enable network backup service
Start (top left) -> Backup & replication -> Backup Destination -> create Local Backup destination -> backup up data to local shared folder -> the name you put in there will be the module name or the path you can use later.
then add the section in /etc/rsyncd.conf changing only the path and comment values (of course under the module name)
restart rsync with
/usr/syno/etc/rc.sysv/S84rsyncd.sh restart
If you don't do this, it will rsync everything without the user name for some reason
Netgear ReadyNas Ultra setup for rsync to Synology
in the /admin interface first
Services -> Standard File Protocols -> ensure Rsync is enabled
Shares -> share listing -> click on rsync icon. scroll up and change default access to 'read only'. Set hosts allowed access to ip of synology (192.168.0.101). Fill in the username and password!
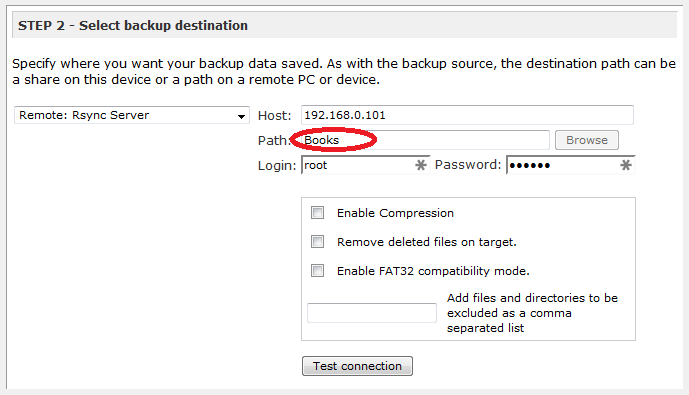
Backup -> Add a new backup job
If you don't fill in the path above it will copy the whole share. If you browse the share you can select a subdir to copy.
Note that the Path needs to be EMPTY before pressing the 'Test connection' button. It will sometimes work if you fill in NetBackup but you're best off doing the test empty, then typing in the path and then apply bottom right to test the backup job.
useful linkies
indexing media files
If you rsync files into the /volume1/photo or /volume1/video directories the system does not index them. They need to be copied in using windows or the internal file manager to index them automatically.
In control panel -> Media library you can re-index the files in the photo directory.
In the video station itself under collection -> settings you can re-index.
As you can't set /video/ as a directory to use in the video station, you have to set a symbolic link from /volume1/video/movie to wherever you want to have your directories.
Warning: indexing can take DAYS!
Preparing ReadyNAS for rsync towards it
Ensure in Shares that the rsync is enabled on at least one share. Ensure the host you are coming from is allowed and that there is a username / password for it.
Symbolic links
Windows can't handle symbolic links on the synology, so you have to mount directories with
mount -o bind /volume1/sourcedir /volume1/destdir
as root
and then copy the mount command to /etc/rc.local to make it stick after a reboot
prepare the windows machine for Picasa
SSH to the synology, log in as root
mkdir /volume1/photo/Pictures
mount -o bind /volume1/photo/ /volume1/photo/Pictures
edit /etc/rc.local
insert the mount command above into the file - this is for when the synology restarts
in windows explorer map \\invader\photo to T:
Picasa database file locations
There are 2 directories in % %LocalAppData%\Google\ which is the same as C:\Users\razor\AppData\Local\Google\
Copy them over before running Picasa for the first time.
NFS
First make sure in Control Panel -> File Services that NFS is enabled.
Then in Control Panel -> File Sharing -> Edit the share -> create NFS Permissions. You should only have to change the IP/Hostname field.
CIFS
sudo mount -t cifs //192.168.0.101/home/ ~/xx/ -o username=razor,uid=razor,gid=users
To find the NAS on linux with netbios
You have to enable the bonjour service on the NAS
Control Panel -> File services -> Enable AFP service, then in Advanced tab -> also enable
The linux machine needs avahi running. Check using
sudo service avahi-daemon status
More info
How to back up data on Synology NAS to another server this should also work for a synology nas to another synology nas
backup via internet NL forum link, aldus deze pagina, poorten:
Network Backup: 873 TCP
Encrypted Network Backup: 873, 22 TCP
How to encrypt shared folders on Synology NAS (uses AES, untick auto mount for stealing, but need to input passd on reboot via web interface)
How to make Synology NAS accessible via the Internet
How to secure your Synology NAS server on the Internet
Reports
In the Storage Analyzer settings you can set and see where the Synology saves reports. For some reason the Synology saves old reports you have deleted and so you can't create new reports with the same name without deleting the old files:
When you create a report task, a dedicated folder for this report will be automatically created under the destination folder that you have designated as the storage location for reports. When you delete a report task from the list on Storage Analyzer's homepage, you delete the report's profile only, while its folder still exists. To delete the report's own folder, please go to the designated destination folder > synoreport, and delete the folder with the same name as the report.
Moments
https://www.synology.com/en-global/knowledgebase/DSM/help/SynologyMoments/moments_share_and_search
Enable Shared Photo Library

Shared Photo Library allows you and users with permissions to collaboratively edit the photos and albums in Moments. Please note that only users belonging to the administrative groups can enable this feature.
To enable Shared Photo Library:

    Click the Account icon on the bottom-left corner and select Settings > Shared Photo Library > Enable Shared Photo Library.
    Click Next to confirm and enable Shared Photo Library.
    Select users to grant them the permissions to access Shared Photo Library.
    Click OK to finish. Now you can switch between My Photo Library and Shared Photo Library.

Note:

    The shared folder named /photo is the default path for Shared Photo Library.
    If you have already installed Photo Station, the photos in Photo Station can be displayed after the source of photos is switched to Shared Photo Library in Moments. Please note that the converted thumbnails in Photo Station will not be processed again.
    After Shared Photo Library is enabled, the Photo Station settings such as album permission, conversion rule, or other downloading settings will not migrate to or be inherited by Moments.
Surveillance Station
Timelapse
Using ffmpeg video stitching with a useful note on getting rid of audio if you're using setpts in ffmpeg
Using Smart Time Lapse which converts videos
Beveiligde documentopslag vanaf EUR 989,-*
AES encryption beveiligt uw bestanden
Snel geplaatst en ingericht naar uw wensen
Data wordt op extra harde schijf gekopieerd voor het geval er een kapot gaat
Mogelijkheid om versleutelde bestanden over internet te backuppen
- inclusief hardware, 1TB opslag en implementatiekosten, excl. voorrijkosten en evt backups / netwerkinstellingen

