Synology
First things to do
Change IP
Control panel -> (connectivity) Network -> tab network interface -> select LAN and click Edit.
Enable home directories + 2 step verification
Control panel -> User -> Advanced -> Enable home user service + Enforce 2 step verification
change workgroup
control panel -> file services -> smb/afp/nfs -> smb / enable smb service : workgroup
Enable SSH
Control panel -> (System) Terminal & SNMP enable SSH
Control panel -> (connectivity) Security -> Firewall tab -> create a rule for SSH (encrypted terminal services), enable and save
for root login as admin and then sudo sh
(you can then log in to the machine using user root and the default admin password)
to enable your users to access the terminal vi /etc/passwd and change /sbin/nologin to /bin/ash
Prepare for rsync
NB the synology can only push rsync files, it can not be set up to pull files from a remote rsync server.
Control panel -> (file sharing) Shared Folder -> create folder to back up to. Give the user you want to rsync to Read/Write access
Control panel -> File services -> enable rsync service
depreciated
Start (top left) -> Backup & replication -> backup services -> enable network backup service
Start (top left) -> Backup & replication -> Backup Destination -> create Local Backup destination -> backup up data to local shared folder -> the name you put in there will be the module name or the path you can use later.
then add the section in /etc/rsyncd.conf changing only the path and comment values (of course under the module name)
restart rsync with
/usr/syno/etc/rc.sysv/S84rsyncd.sh restart
If you don't do this, it will rsync everything without the user name for some reason
Synology to synology
You backup from the source to the target
ssh into the source machine (mind the slashes at the end! if you don't use the slash it will create a directory in the directory you specify)
rsync -avn /volume1/sourcedirectory/ user@192.168.0.105:/volume1/targetdirectory/
to check if it works. Drop the n to start the actual copy.
Hyper Backup
This will create a backup directory which you can't browse with file explorer as it stores everything in a hyper backup format.
Using Hyper Backup Vault
Note: the destination needs the Hyper Backup Vault package installed. Launch Hyper backup on the source. Use the + bottom left to create a new backup job. Select data backup. Select Remote NAS device. fill in the hostname and then you can select which Shared folder it will use as a destination. Note: you cannot use photos or homes. The Directory is the name of the directory it will make on the shared folder on the destination device.
Using rsync
Launch Hyper backup on the source. Use the + bottom left to create a new backup job. Choose rsync. Fill in the data. As username and password you need a username and pass on the target machine. It will then fill the shared folder list with shares available on the target. You cannot backup to the root directory of the target share, so you need something in the directory field. After this it pretty much sets itself up.
Netgear ReadyNas Ultra setup for rsync to Synology
Here we set up the Netgear to pull data from the Synology
in the /admin interface first
Services -> Standard File Protocols -> ensure Rsync is enabled
Shares -> share listing -> click on rsync icon. scroll up and change default access to 'read only'. Set hosts allowed access to ip of synology (192.168.0.101). Fill in the username and password!
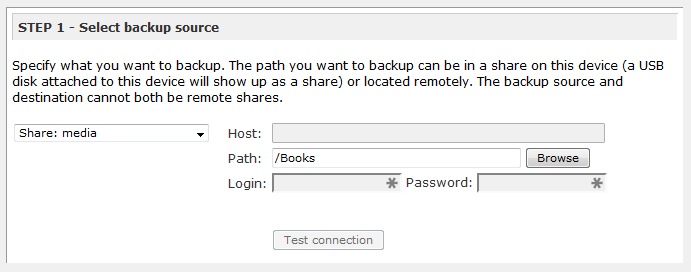
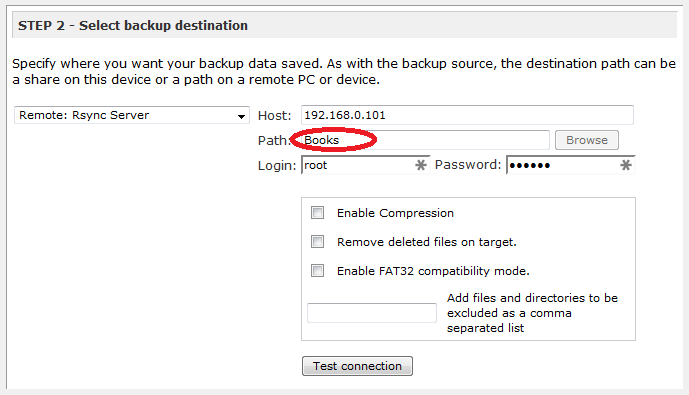
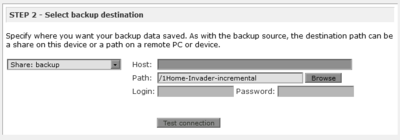
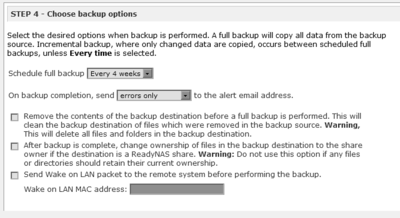
Backup -> Add a new backup job
If you don't fill in the path above it will copy the whole share. If you browse the share you can select a subdir to copy.
Note that the Path needs to be EMPTY before pressing the 'Test connection' button. It will sometimes work if you fill in NetBackup but you're best off doing the test empty, then typing in the path and then apply bottom right to test the backup job.
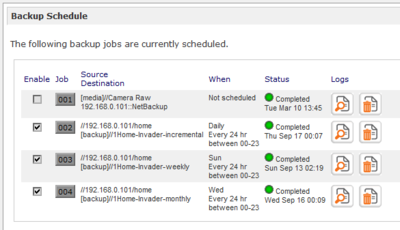
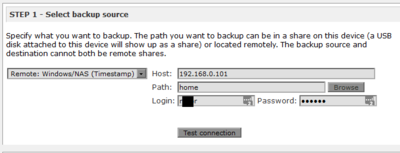
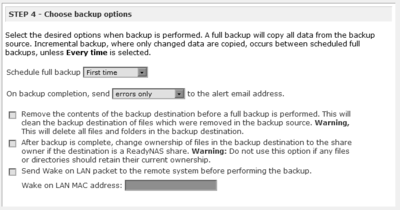
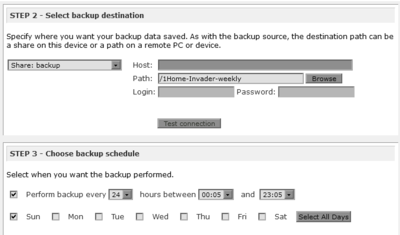
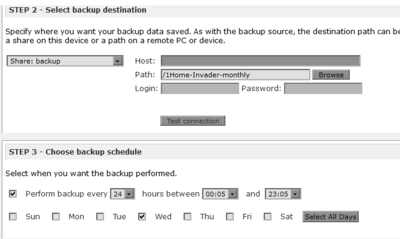
This is what the schedule will look like
The Daily job
The Weekly job
The monthly job
useful linkies
indexing media files
If you rsync files into the /volume1/photo or /volume1/video directories the system does not index them. They need to be copied in using windows or the internal file manager to index them automatically.
In control panel -> Media library you can re-index the files in the photo directory.
In the video station itself under collection -> settings you can re-index.
As you can't set /video/ as a directory to use in the video station, you have to set a symbolic link from /volume1/video/movie to wherever you want to have your directories.
Warning: indexing can take DAYS!
Preparing ReadyNAS for rsync towards it
Ensure in Shares that the rsync is enabled on at least one share. Ensure the host you are coming from is allowed and that there is a username / password for it.
Symbolic links
Windows can't handle symbolic links on the synology, so you have to mount directories with
mount -o bind /volume1/sourcedir /volume1/destdir
as root
and then copy the mount command to /etc/rc.local to make it stick after a reboot
prepare the windows machine for Picasa
SSH to the synology, log in as root
mkdir /volume1/photo/Pictures
mount -o bind /volume1/photo/ /volume1/photo/Pictures
edit /etc/rc.local
insert the mount command above into the file - this is for when the synology restarts
in windows explorer map \\invader\photo to T:
Picasa database file locations
There are 2 directories in % %LocalAppData%\Google\ which is the same as C:\Users\razor\AppData\Local\Google\
Copy them over before running Picasa for the first time.
NFS
First make sure in Control Panel -> File Services that NFS is enabled.
Then in Control Panel -> File Sharing -> Edit the share -> create NFS Permissions. You should only have to change the IP/Hostname field.
CIFS
sudo mount -t cifs //192.168.0.101/home/ ~/xx/ -o username=razor,uid=razor,gid=users
To find the NAS on linux with netbios
You have to enable the bonjour service on the NAS
Control Panel -> File services -> Enable AFP service, then in Advanced tab -> also enable
The linux machine needs avahi running. Check using
sudo service avahi-daemon status
DLNA
The video players such as a TV (eg on an LG TV under "photos and videos" app) that play directly from the NAS use DLNA. The synology (or DLNA server) creates a database which the player reads.
The settings for the Media Server / DNLA can be found under the synology start menu -> media server. It is quite possible that Synology decides it doesn't like your player much and gives it a device type which it's not happy with. Under DMA Compatibility -> Device List you can change the profile to Default profile, which may help.
If the database is somehow damaged, you can rebuild it under control panel -> indexing service and then click re-index. This can take days!
To check the status of the rebuild, ssh in (using admin / pw, then sudo su) and you can check to see what's being rebuilt by issuing
ls -l /proc/$(pidof synomkthumbd)/fd
To monitor what's happening over some time do (nb it will take some time before you see anything appear!)
while sleep 30; do ls -l /proc/$(pidof synomkthumbd)/fd | grep volume; done
If the indexing service seems frozen then restart it with
synoservicectl --restart synoindexd
Streaming
The audio station DS Audio app is terrible and hangs a lot.
As alternatives there are Jellyfin; Airsonic and mstream. So far I like mstream, it's very light (388MB docker image, as it's file based.
Jellyfin
very library based and uses quite a bit of CPU - no folder view
Airsonic
Comes in 2 flavours: airsonic and airsonic-advanced. The advanced version is a fork created due to frustration with the glacial pace of development of airsonic. Reddit rant here
MxStream
Super lightweight:
iamge is 388 MB
fresh install:
CPU: 0.85%
RAM: 111 MB
file based
Gerbera BubbleUpnP
Plex
Complaints about it being slow and jumpy - only for local streaming - also if you want to use it for streaming or downloading for internet streaming you need to pay
Beets
re-organise your music collection?
Converting media files
Photo station converts your videos to flv as standard and to mp4 if you have conversion for mobile devices set to on under control panel -> indexing service.
It will also convert your image files to thumbnails as standard.
This can take a few days or even weeks if you upload a lot of new stuff.
To speed the photo thumbnail generation up you can do the following:
/usr/syno/etc.defaults/thumb.conf
- changed the quality of thumbs to 70%
- divided by 2 all the thumbs size
- change the XL thumb size to 400 pixels
To view the status of the conversion, in /var/spool there are the following files
conv_progress_photo
conv_progress_photo.pT5Pu5
conv_progress_video
conv_progress_video.CpHdpS
flv_create.queue
flv_create.queue.tmp
thumb_create.queue
thumb_create.queue.tmp
or
ps -ef | grep thumb
To see the status of the converter
sudo synoservicecfg --status synomkthumbd
More info
How to back up data on Synology NAS to another server this should also work for a synology nas to another synology nas
backup via internet NL forum link, aldus deze pagina, poorten:
Network Backup: 873 TCP
Encrypted Network Backup: 873, 22 TCP
How to encrypt shared folders on Synology NAS (uses AES, untick auto mount for stealing, but need to input passd on reboot via web interface)
How to make Synology NAS accessible via the Internet
How to secure your Synology NAS server on the Internet
Reports
In the Storage Analyzer settings you can set and see where the Synology saves reports. For some reason the Synology saves old reports you have deleted and so you can't create new reports with the same name without deleting the old files:
When you create a report task, a dedicated folder for this report will be automatically created under the destination folder that you have designated as the storage location for reports. When you delete a report task from the list on Storage Analyzer's homepage, you delete the report's profile only, while its folder still exists. To delete the report's own folder, please go to the designated destination folder > synoreport, and delete the folder with the same name as the report.
Moments
https://www.synology.com/en-global/knowledgebase/DSM/help/SynologyMoments/moments_share_and_search
Enable Shared Photo Library

Shared Photo Library allows you and users with permissions to collaboratively edit the photos and albums in Moments. Please note that only users belonging to the administrative groups can enable this feature.
To enable Shared Photo Library:

    Click the Account icon on the bottom-left corner and select Settings > Shared Photo Library > Enable Shared Photo Library.
    Click Next to confirm and enable Shared Photo Library.
    Select users to grant them the permissions to access Shared Photo Library.
    Click OK to finish. Now you can switch between My Photo Library and Shared Photo Library.

Note:

    The shared folder named /photo is the default path for Shared Photo Library.
    If you have already installed Photo Station, the photos in Photo Station can be displayed after the source of photos is switched to Shared Photo Library in Moments. Please note that the converted thumbnails in Photo Station will not be processed again.
    After Shared Photo Library is enabled, the Photo Station settings such as album permission, conversion rule, or other downloading settings will not migrate to or be inherited by Moments.
Installing ipkg
by plexflixler Go to the Synology Package Center, click on "Settings" on the top right corner and then click on "package sources".
Add the source "http://www.cphub.net" (you can choose the name freely, i.e. "CPHub")
Now close the settings. In the package center on the left go to the "Community" tab.
Find and install "Easy Bootstrap Installer" from QTip. There is also a GUI version if you prefer, called "iPKGui", also from QTip.
IPKG is now installed. The executables are located in "/opt/bin/". You can SSH to your NAS and use it. However, the directory has not yet been added to the PATH variable, so to use it you would always need to use the full path "/opt/bin/ipkg".
You can add the directory to the PATH variable using the following command:
export PATH="$PATH:/opt/bin"
However, this would only add the directory to PATH for the current session.
  sudo /opt/bin/ipkg update
  sudo /opt/bin/nano /etc/profile
Now find the PATH variable. It should look something like this:
PATH=/sbin:/bin:/usr/sbin:/usr/bin:/usr/syno/sbin:/usr/syno/bin:/usr/local/sbin:/usr/local/bin
At the end of this string, just append ":/opt/bin" (don't forget the colon). Then save and close the file
Note that this will not automatically update your PATH for the current session. To do this, you can run:
source /etc/profile
To check wheter it worked, enter the command:
echo $PATH | tr ":" "\n" | nl
You should see the entry for "/opt/bin" there.
Now your all set.
Installing mlocate
requires ipkg (see above)
ipkg install mlocate
Once you have done that, you run
updatedb
and then you can use the locate command
Universal search
For some reason when installing universal search it doesn't add the shares to the index. You have to do this by hand in settings.
Surveillance Station
Timelapse
Using ffmpeg video stitching with a useful note on getting rid of audio if you're using setpts in ffmpeg
Using Smart Time Lapse which converts videos
Beveiligde documentopslag vanaf EUR 989,-*
AES encryption beveiligt uw bestanden
Snel geplaatst en ingericht naar uw wensen
Data wordt op extra harde schijf gekopieerd voor het geval er een kapot gaat
Mogelijkheid om versleutelde bestanden over internet te backuppen
- inclusief hardware, 1TB opslag en implementatiekosten, excl. voorrijkosten en evt backups / netwerkinstellingen
Docker
Generally the workflow is:
docker -> add image (from the registry or from a url, eg airsonic/airsonic) -> double click image to create a container -> edit the advanced settings (auto restart on, add volumes, network, etc) -> confirm -> run container -> monitor the container in the container part
volumes / permanence
These are locations on the synology that can be mounted in the container.
When installing docker a new main share: docker is created.
Using add volume you can choose a volume - if it's internal stuff to the container (eg /var/log) you select (or create) the folder(s): /docker/containername/var/log and then use the mount path /var/log to mount that location within the container.
In the docker cli instructions for an image this can be seen as the -v options
So if you are trying to mount your music you would mount /music/ to /music - you need to look out for permissions!
Permissions
For music and video: DLNA in Media Server;
GUID and GPID env variables
advanced permissions are places to look if you can view the files in the container terminal but the application in the container can't see the files! (you can check for advanced permissions by allowing Everyone read access in the normal permissions and seeing if the application can find them then)
file permissions also of the /docker/imagename/ directories
Don't forget to check Apply this folder, sub-folders and files!
network port forwarding / connecting from outside the host
You have two options here:
1. network=host: while starting (=creating) a container from an image, you can enable the checkbox "use same network as Docker Host" at the bottom in the "network" tab in additional settings. As a result you do not need to map any ports from dsm to the container, as dsms network interface is directly used. You need to take care of potential port collisions between dsm and the container of course.
2. network=bridged: map ports from the Docker Host (DSM) to the container. You can not access the ip of the container directly, though, you can access the mapped port on the Docker host. The potential port collision bettween dsm and containers are here possible as well.. but they can be corrected easier since you can just change the Docher host port which needs to be still mapped to the same D ocker port.
In both cases the port can be accessed via dsm:port, though for option 1) this is only true if you did not change the ip INSIDE the container, if you did it will be container-ip:port.
Connect to a docker container from outside the host (same network)
So to have the external port be the same as the external port in bridged mode, edit the container and set the local port to be the same as the container port
In the docker cli instructions for an image this can be seen as the -p options
TODO: How to run docker over https
Environment
Here you can add extra environment variables, eg TZ / GUID / PUID
You can find your users PID and GID by sshing into the synology and typing
id
or
id username
The GUID and PUID are the IDs for which the container itself will run, not docker (which will run as root)
setting up a docker using cli arguments
As an example Mstream from linuxserver (you can find the image in the docker registry or add it using url linuxserver/mstream
has docker cli
docker run -d \
  --name=mstream \
  -e PUID=1000 \
  -e PGID=1000 \
  -e TZ=Europe/London \
  -p 3000:3000 \
  -v /path/to/data:/config \
  -v /path/to/music:/music \
  --restart unless-stopped \
  lscr.io/linuxserver/mstream
So you have to fill in your own gid / pid / timezone in the Environment part of the container. You set the port to be both 3000 inside and outside in a bridged network connection. You select /docker/mstream/config to mount as /config and you select your music library on the synology to mount to /music. You ensure permissions are right and you should see the files in mstream.
Logging and troubleshooting
double clicking an container allows you to see the logs in a tab, which will help a lot. You can also access an active terminal in a tab on a running container
