Honeywell Evohome heating
Evohome Installation Guide File:evohome Installation Guide - gateway model.pdf
hardware
For heating you need a smart radiator valve / TRV (thermostatic radiator valve) / Central heating valve
Conrad has these which are programmable but not smartthings
Honeywell Evohome will be compatible with smartthings soon (they have been saying for years)
Tado
Danfoss doesn't seem to work
So far it looks like you will have to connect the brand thermostat to the TRV
Your smart heating package constists of the following:
- TRVs for the radiators
- a thermostat
- a controller / receiver for the CV installation.
The controller / receiver comes in 2 types:
- opentherm: an open standard that allows graduated control over the heat the CV generates http://centrale-verwarming-combiketels.welke-kiezen-kopen.nl/opentherm-wat-is-het-voordeel-cv-ketels.php
- on / off
When you install your system, you also need a bypass to allow for water to circulate. A possibility is to have one of your radiators on all the time, to act like a bypass. https://support.resideo.com/s/article/Does-a-radiator-valve-need-to-be-always-open-in-case-of-the-Evohome?language=en_US Honeywell has the DU144 for this.
Honeywell has a 4 zone wifi kit for EUR 483 https://www.cvkoopjes.nl/honeywell-zoneregeling/honeywell-evohome-wi-fi-4-zone-aanuit-pakket.html?gclid=CLPV8bz8nswCFegp0wodKVgGSA#/75-garantie-2_jaar_standaard/ and for EUR 505 http://www.paradigit.nl/honeywell-evohome-multi-zone-radiatorpakket-on-off/80039504/details.aspx?channel_code=210&s2m_product_id=80039504&utm_source=adcore-v4&gclid=CMbUnKz7nswCFeQp0wodjBIC6Q
You can buy the receiver seperately for around EUR 100,-
There's also a remote sensing TRV head, for if your radiator is enclosed
https://www.kijkvoelbeleef.nl/Honeywell/Producten/Product/Distance-Plus/ (in NL they are called Distance Plus)
but I don't know if they are compatible with EvoHome.
Unfortunately the Nefit Ecomline HR line of CVs is on/off only and doesn't have an opentherm adapter. There is an adapter for their own smart thermostat, but you can't use that to connec to the Honeywell Evohome.
evohome controller
The Evohome controller has a maximum of 12 zones. Floor heating needs it's own zone and cannot be combined with a TRV.
variants
There are three versions of the controller:
- The old controller uses the RFG100 Internet Gateway Comfort [1] to connect to internet and allows totalconnectcomfort to set the temp via internet
- The 'standard' BDR91 (standard on/off wireless relay box) or R8810 (opentherm) for the past few years is the wifi controller, with the screen. It will connect to your own network and you can control the temperatures with a 5o granularity. The API connection to Honeywell is rate limited.
- The HG180 interface [2] allows you to control directly using Domoticz, Somfy Tomoha and Electrabel Smart with a granularity of 1o and unlimimted API calls using a USB connection to the server. You won't have to rely on Honeywell being up.
With a HGI80 you can poll the status for logging purposes as often as you like. With the API, access is rate limited to every few mins so as not to overburden Honeywell. HGI80 also works with Domoticz when the Honeywell cloud service is down for maintenance. With the HGI80 you also get to see the radiator valve percentage open/closed status in Domoticz. Not possible with API.
From [3]
Honeywell Home wireless controls operate at 868 MHz.
The operating range is a maximum of 30 metres.
Where multiple wireless devices are fitted in the same property it is essential that the receivers are installed at least 30cm apart from each other. The receivers should also be installed at least 30cm away from other sources of interference such as other wireless devices, electrical installations and solid metal objects (including the boiler).
Please see the below illustration for reference:

If communication between the sender and receiver is continually lost then consideration should be given to relocating one or other of the devices. All of the Honeywell Home wireless devices feature a wireless signal strength test facility and the signal strength should be tested. If necessary the devices should be moved until a good signal strength is achieved.
In rare cases it is possible that a wireless device will not work in a specific situation and the cause of this is not always able to be determined. If relocating devices cannot overcome the problem then consideration needs to be given to installing a hard wired device.
system configuration
File:evohome-installation-guide.pdf
To get into the installation menu, you need to long press the settings icon. This allows you to configure zones, system devices, system parameters, add zone, system summary, fr comms check and factory reset.
Try to not use spaces in zone names (for graphing)
BDR91
Binding Binding mode is activated by pressing and holding the button for 5 seconds. During binding mode the relay will be set to the off condition.
   RED light will flash on/off every second while in binding mode. (0.5s on, 0.5s off). Successful binding will turn the RED light off.
   A 3 minute timer will operate during binding mode. Unsuccessful binding will cause the RED light to be constantly on and the GREEN light to flash once with 0.1s on and 3 sec off duration. The error condition will be cancelled after 30 minutes.
   If unit currently has been bound with 4 controllers for control information and an attempt is made to bind a 5th then the RED light will be constantly on and the GREEN light will flash twice with 0.1s on time and then be off for 3 sec. This error condition will be cancelled after 30 minutes.
   It will not be possible to bind the unit with a controller for synchronization information before it has been bound to a unit for control information, if attempted the RED light will be constantly on and the GREEN light will flash three times with 0.1s on time and then be off for 3 sec. This error condition will be cancelled after 30 minutes.
   If the unit is bound to more than one controller and is configured for cooling, the RED light will be constantly on and the GREEN light will flash five times with 0.1s on time and then be off for 3 sec. During this time the relay will be held off.
Loss of communications While the unit is operating in Loss of Communications mode GREEN light indicates relay status is on.
   If the unit is bound to more than one controller and communications have been lost from some, but not all, of these controllers the RED light will flash 2.5sec on, 2.5sec off.
   If the unit has lost communications from all the controllers it is bound with, the RED light will be on continuously.
   Loss of communications for a period of 1 hour or more will be indicated to the user. After this period, control action will be defined as per the  Loss of Communications installer setting configured in the controller (fail safe modes) and the device the unit is controlling
Power Up & Reset Operation
   When power is first applied the unit will have no valid binding data and the RED light will flash at approx 0.1s on, 0.9sec off. The push button and GREEN light will respond as in normal operation mode.
   If unit has no valid binding data, the RED light will flash at approx 0.1s on, 0.9sec off.
   The factory reset will return the unit to the conditions at first power-on. This is initiated by pressing and holding the push button for 15 seconds. After reset the push button must be released prior to any other action of the BDR91.
   If not bound to a controller in a pack, the factory reset mode will be the designated shipping condition.
   Returning the unit to the factory reset condition will cancel the display of any error conditions.
Communication Fault Codes & Diagnostics
   Verification of communications integrity is achieved through the use of the Memory Data message. On receipt of a valid Memory Data message the unit will react immediately. The action taken will depend on the data value received. Of this class of messages only the action for signal strength indication is described below:
   RED light flashes to give indication of signal strength, 5 flashes for strong signal, 1 flash for weak signal.
   If the BDR has no lights coming on, even after pressing its button, then the wiring needs to be checked. If the wiring was done properly, then the unit is faulty and needs to be replaced.
How to rebind the boiler BDR91 from the controller / How to put the controller into binding mode
In order to connect the BDR91 which is wired to the boiler to the evohome controller, please follow the below steps:
Put the relay box in binding mode, by checking the article How to bind a BDR91 Wireless Relay Box to the evohome controller
1.Press and hold the Settings icon until the message "System configuration" will appear on the display
2. Press the green tick
3. Press System devices
4. Press Boiler control
5. Press on Wireless relay box and after on the green tick
6. Press Wireless Relay Box
7. a change boiler control box will pop up asking you if you want to remove any previously bound boiler controls. tick green.
8. Press the green bind button
How to bind a BDR91 Wireless Relay Box to the evohome controller? 1. If the evohome controller is already in the binding mode proceed with the next steps, if not, follow the steps described in the following knowledge article: How to put the evohome controller into binding mode (above)
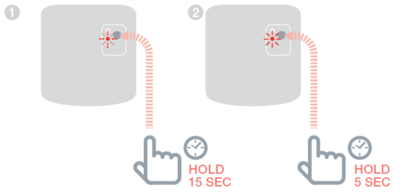
2. On the Wireless Relay Box, press and hold the button for 15 seconds (until the red LED blinks rapidly) to clear any previous binding data.
3. Press and hold the button again for 5 seconds (until the red LED blinks slowly).

Clearing binding info on BDR91 4.On the evohome Controller press the green bind button.
5.You should receive a "SUCCESS" message on the evohome Controller (if not go back and re-bind).
force TRV comms with the BDR91
It seems that the BDR91 won't turn on after a power failure. What should happen is that it will turn on once one of the TRVs tries to communicatie with it. The fastest way to force this is to pop out the batteries from one of the TRVs and put them back in. UNTESTED
HR92 TRV
This is the hardware that attaches to your radiator.
File:hr92_installation_user_manual.pdf
attaching TRV to radiator
Ensure the screwcap fitting is completely open / turned left / has pointy bit in white thing retracted before fitting to radiator (ie radiator is at heat full on). Connect and lock the TRV in this screw setting. It will then perform a full cycle to on then off and then go into operation. If you press the thing on the radiator in, you turn off the heat. If you leave it alone (ie it's full out) you turn on the heat.
adding multiple TRVs to a zone
Keep the TRVs physically close to the controller.
After creating the zone, add the first TRV (press button once to see "unbound", long press button until you see "bind", press button until you see "success"). Wait for sync to finish and press the button on the TRV. You should now see the zone name.
It will then ask you to add more sensors. Put them all into binding mode (see above) and THEN press the bind button on the controller. It will add them all silmutaneously. WAIT for syncing to stop and check each TRV to see if they have been added to the zone (press button once) before pressing OK / green tick on the controller.
default temperature sensor when using multiple TRVs in a zone
if it is a zone using multiple HR92, the FIRST one that you bind is sensor and actuator, subsequent HR92s bound are only bound as actuators
however
if you then go into system parameters, zone parameters
you can change from a single to multiroom zone
this enables every HR92 to be sensor and actuator
temperature sensitivity
The sensitivity only works to 0.5oC, which means that accuracy is off to at least this and the system will not compensate for this temp difference. Also, if you manually change a temp setting on the TRV and the next temp in the programmed block is around 0.5oC difference, it will not go back to the programmed block setting, but stay in manual override. For a discussion see here.
For a discussion on why a radiator valve could be on permanently because the radiator itself doesn't have sufficient capacity to heat up the room see here
rezoning a TRV
To rezone a TRV you need to unbind ALL TRVs from the old AND new zone, destroy the zone on the controller and then rebind. Otherwise things can Go Wrong. Note that the first TRV to connect to a new zone is the one which will measure the temperature, if there are multiple TRVs per zone.
unbind a TRV from a zone
To unbind a bound TRV, first click the button once. It will show the room it is bound to. Now press and hold the button until the display says "bind". (you can also do a RF check from this menu). With "bind" in the display, press and the button. It will say "binding". Press and hold the button. The display will show "cleared". At this point release the button. If you press the button once, it will show "unbound".
Note - if you change the settings on the TRV and under 12 restore to factory settings, this will NOT destroy the binding - it is retained.
bind the TRV
How to bind the HR92 to Evohome controller? First get the evohome controller, go to the configuration menu (long press settings), go to the zone configuration -> select zone -> rf zone binding.
Basically press the button once, it will say "unbound". Then press the button for five seconds. The display will say "bind". You should receive a SUCCESS message on the evohome controller(if not go back and re-bind). The name of the allocated zone should appear on the HR92 display when you press the User-added image button.
changing TRV settings
How to change the parameters on the HR92 Wireless Radiator Controller?
To change language, backlight, duration of window function, sensitivity of window function, valve stroke, temperature representation in display, temperature offset, battery type, display of the valve position, window open function and reset to factory settings (NB does not unbind from the zone!) keep the button pressed for five seconds (NB NOT when showing a zone name!). Keep the image button pressed for approximately 5 seconds until Parameter 1 flashes (left-hand digit). The right hand digit shows the current setting. The parameter is displayed additionally in plain text ; for example, the display 1 1 stands for Parameter 1 (language) with Setting 1 (English). Use the adjustment dial to select the desired parameter (left-hand digit). Press the button to edit the parameter. The current setting of the parameter flashes (right-hand digit). Use the adjustment dial to set the desired setting (right-hand digit) and confirm with button. For the further parameters repeat. To exit the menu, select "EXIT" using the adjustment dial and confirm with the button.
Note: resetting the TRV does not unbind it from it's zone.
Settings for TRVs (I live in an older house) - turn off the windows!
  3 0
  7 1
  11 0


Connecting the TRV using an adapter / if the heating stays hot
This happens because the fitting is not compatible. You will need a radiator adapter

Todocontrol has another adapter R453HY012 which you can screw into the TRV as an alternative
If the temperature in a zone keeps overriding to 5 degrees
You have to rezone: ie, unbind the TRVs, then delete the zone, then create the zone, then rebind the TRVs. See also [4]
graphing / logging evohome over time
Decoded EvoHome API access to control remotely thread
Most graphing modules need you to have the evoconnect connected to your heating. Setup guide - Honeywell Total Connect Comfort + Cacti
Home Assistant has a binding with rrd type history graphs
Evohome-munin uses the web api and is pretty accurate Find munin here
My guide to grafana / influxdb
here is a guide to using python and plot.ly
Domoticz has a nice and easy graphing for Evohome
SmartThings Data Visualisation using InfluxDB and Grafana thread with some really nice dashboard examples in the comments
Andrew Blake Evohome Utils Github
- Perform logging of your EvoHome thermostat actual and target temperatures
- Log to either CSV or InfluxDB (or both)
- Backup and restore weekly setpoint schedules
- Log to Influx to then visualise easily in Grafana
jankeesvw Evohome to InfluxDB This is a docker container that pushes data from the Honeywell Evohome API to InfluxDB.
Freeranger To allow you to read your actual and desired temperatures from your EvoHome system (and others) and log them to a variety of destinations. Destinations include "data stores" such as .csv files or influxdb database for further ingestion by Excel or grafana respectively, or directly to graphing websites such as Plot.ly and emoncms
Grafana Builds dashboards. open source software for time series analytics, No matter where your data is, or what kind of database it lives in, you can bring it together with Grafana. Beautifully.
Prometheus seems to be fairly popular, but I haven't seen many screenshots yet
Note - Influxdb or graphite are better databases for logging this kind of data as they are time series dbms
A Time Series DBMS is a database management system that is optimized for handling time series data: each entry is associated with a timestamp.

For example, time series data may be produced by sensors, smart meters or RFIDs in the so-called Internet of Things, or may depict the stock tickers of a high frequency stock trading system.

Time Series DBMS are designed to efficiently collect, store and query various time series with high transaction volumes. Although time series data can be managed with other categories of DBMS (from key-value stores to relational systems), the specific challenges often require specialized systems.
E.g. a query like 'SELECT SENSOR1_CPU_FREQUENCY / SENSOR2_HEAT' joins two time series based on the overlapping areas of time for each and outputs a single composite time series.
Unfortunately the Cacti template can't be downloaded any more :(
The API rate limit to allow you to poll device status every 5 minutes for up to 20 devices per hour, with a little cushion to make changes. If you need a higher rate limit, please contact us: HoneywellAPISupport@honeywell.com
Support pages
Ghost zones
If you see a zone in the app or website that does not appear in the controller display and is set at 62o C then a ghost zone has appeared. To resolve:
   Log out of the TCC app
   log in to the TCC webportal.
   Click on your location
   Click on Comfort System / View Settings
   In the bottom right click "remove comfort system"
   Logout
   Wait 10 minutes
   Login again
   Add the comfort system / thermostat. MAC address + CRC can be found under wifi settings on the display